
Software projects follow different development workflow practices which include testing, coverage, style-standards, code-reviews, etc., to yield a code-base that’s easy to maintain and bug-free. However, these practices are often manual, redundant, time-consuming, and not-so-strictly enforced which may discourage the stakeholders from following them and deprive them a lot of inherent benefits. Moreover, the redundancy of these activities might impact productivity.
The intent of this post is to go through different automated processes like git hooks, continuous integration, python scaffolding, and more. We can inject these into our software production pipeline to save time and achieve a maintainable code-base and a hassle-free deployment.
Automating your Development Workflow: An Illustration using Python
To demonstrate some of these automated processes by the implementation, let’s use an example of developing a very simple REST API using python-flask. We’ll follow “Feature Branch workflow” for the project as well. This core idea includes the following:
- Scaffolding the project: Initializing a repository or cloning the hosted project repository from remote, installing the dependencies, etc.
- Creating the feature branch
- Writing the code
- Submitting a pull request
- Code review and re-iteration of the Pull Request until everyone is happy
- Merge into the master branch
- Optimization (if any) and deployment to the production
To ensure code quality, no production breakages, and maintainability, here a few activities that we would like to perform during the development workflow.
Ensure that your codebase is compliant to some style standard
This involves getting affirmations for questions like:
- Are we using single quotes or double quotes consistently for representing strings?
- Is every line within the 80 character limit?
- Do all the files end with a newline character?
- Are we consistent with naming conventions (
snake_caseorcamelCase) for filenames and symbols?
Ensure that tests are passing
- Are we sure that the new feature will not break any existing functionalities?
Acknowledge that the tests cover any new changes
- Have the tests been written for the newly added feature?
- Do the newly written test cover all the scenarios or at least the major ones? In other words, what’s the case coverage of the new code?
More items for our code base checklist
- Are the commit messages descriptive enough? Does the commit message follow the guidelines?
- Are there any special non-ASCII character used in the code or file names?
- Is the project building successfully and ready to deploy?
- Is the project functioning on all the platforms it is supposed to support?
- And so on…
This checklist of tasks to be performed (by developers and code-reviewers) for every Pull Request iteration of our feature is quite long. To avoid skipping any such checks (which can be critical), most of the open source organizations have guidelines to serve as a checklist of things needed to verify. Guidelines such as the checklist provided above.
And if we observe, most of these tasks are definitive (and repetitive), it means they can be automated. We’ll observe where and how to inject the automated versions of these tasks in order to create a more efficient workflow. Here are a few ways in which automation will help in this process:
- Reducing the mental overhead for developers and code reviewers
- Delegating the work to the software (since software don’t mind doing boring, redundant tasks)
- Most importantly, saving time, and hence improving productivity
So let’s get started with it!
Let the development begin!
Python scaffolding

First, we’ll initialize an empty git repository and implement a minimal working version of our server. For projects with intricate tech-stacks, one might consider using python scaffolding tools available on open-source (like cookiecutter and pyscaffold), but for us, installing the dependencies and writing simple flask hello world program should suffice for now.
Here’s our app.py file,
# File: app.py
from flask import Flask, request

app = Flask(__name__)

@app.route('/')
def hello_world():
    return 'The server is up and running!'
And here’s our requirements.txtfile wherein we store our dependencies.
# File: requirements.txt
Flask==1.0.2
gunicorn==19.9.0
The core idea behind therequirements.txt file is to keep track of dependencies and their versions so that they can be exactly replicated in other collaborator’s systems. This allows the production server to avoid impromptu breakages due to weird dependency issues.
Working on the feature
The project is scaffolded; it’s time for devs to work on a feature. For simplicity, let’s say our feature is to “Create an endpoint for the division of two numbers”.
# File: app.py
from __future__ import division
from flask import Flask, request

app = Flask(__name__)

@app.route('/')
def hello_world():
    return 'Hello World!'

@app.route('/division')
def get_division():
    x = float(request.args.get('x'))
    y = float(request.args.get('y'))
    return str(compute_division(x,y))

def compute_division(x, y):
    if y == 0:
        return float('inf')
    return x/y
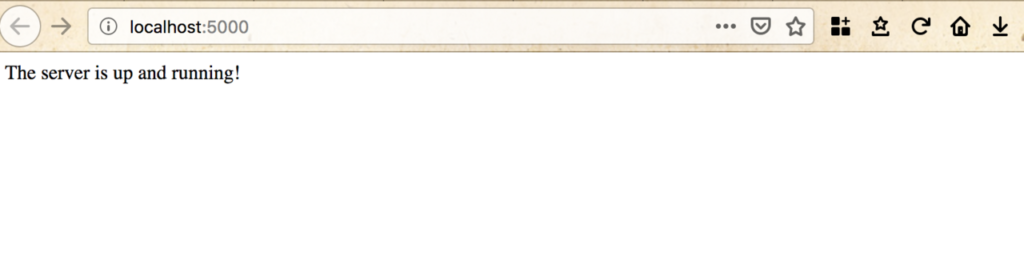
Let’s do a sanity check if everything works,
➜  autodevelop git:(master) ✗ export FLASK_ENV=development
➜  autodevelop git:(master) ✗ export FLASK_APP=app.py
➜  autodevelop git:(master) ✗ flask run

 * Serving Flask app "app.py" (lazy loading)
 * Environment: development
 * Debug mode: on
 * Running on http://127.0.0.1:5000/ (Press CTRL+C to quit)
 * Restarting with stat
 * Debugger is active!
 * Debugger PIN: 130-555-941
127.0.0.1 - - [11/Feb/2019 01:20:50] "GET / HTTP/1.1" 200 -
The server is up.

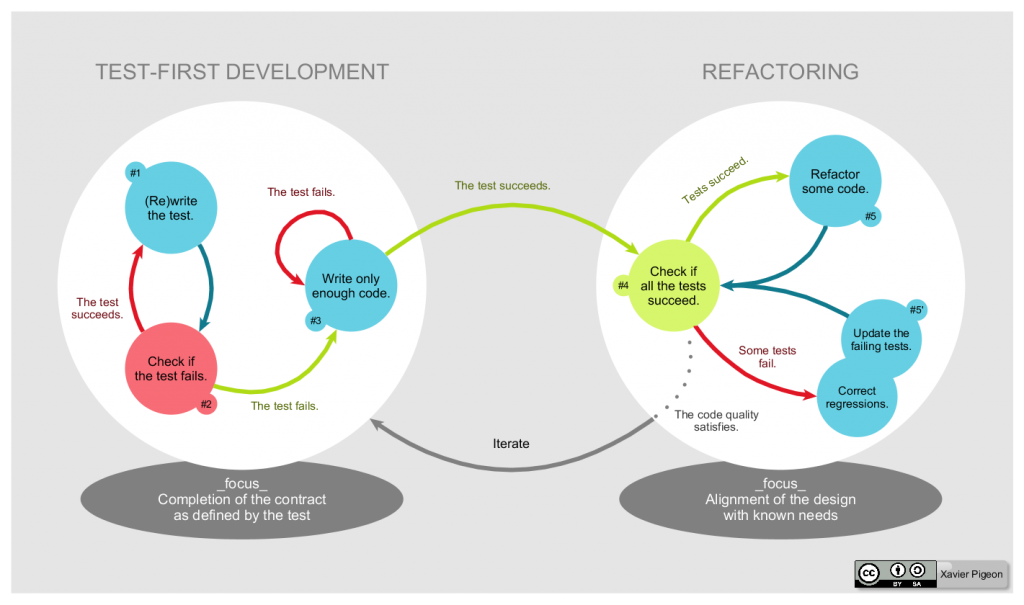
The code looks neat. Let’s write tests for it. One might follow TDD and write tests upfront before implementing the feature; either way seems fine for our small feature.
# File: test_app.py
from autodeploy import app


def test_compute_product_non_zero():
    assert(compute_division(4, 2) == 2)


def test_compute_division_fraction():
    assert(compute_division(2, 4) == 0.5)


def test_compute_division_zero_denomintor():
    assert(compute_division(2, 0) == float('inf'))


def test_compute_division_zero_numerator():
    assert(compute_division(0, 2) == 0)
Here’s our project’s directory structure for reference
.
├── autodevelop
│   ├── __init__.py
│   └── app.py
├── requirements.txt
└── tests
    ├── __init__.py
    └── test_app.py
Nothing fancy, just basic tests for our compute_product function covering all the branches.
Let’s run the tests and see if they pass.
(venv) ➜  project git:(master) ✗ pytest
======================================================== test session starts ========================================================
platform darwin -- Python 3.6.5, pytest-4.1.1, py-1.7.0, pluggy-0.8.1
rootdir: /Users/300041709/Desktop/cm/python_deployment_pipeline/project, inifile:
plugins: cov-2.6.1
collected 4 items

tests/test_app.py ....                                                                                                        [100%]

===================================================== 4 passed in 0.14 seconds ======================================================
We have used pytest to run the tests, as it supports some nice features like autodiscovery of tests, detailed reports of test runs, and also has a few handy plugins available for specific scenarios. Also, we used simple assert statements for the tests, but for intricate test cases, it is recommended to use the unittest module.
Let’s specify the dependencies to run the tests in a separate file dev-requirements.txt to differentiate between the application’s dependency and the dependencies required to run tests.
# File: dev-requirements.txt
pytest==4.1.1
Once the unit tests and the code is written, it’s time for the dev to create a Pull Request for others to review. But before creating a PR, there a few checklist tasks that the dev has to perform,
- Make sure that the newly written tests have enough coverage.
- Make sure all the unit tests pass
- Check for discrepancies against style guidelines
- Fix issues related to the above checks (if any), and repeat.
All this is necessary to ease the life of the code reviewer, and prevent multiple iterations of the Pull request due to silly mistakes.
Let’s see how we can automate such tasks.
Create My Own Development Server
Git hooks to the rescue!
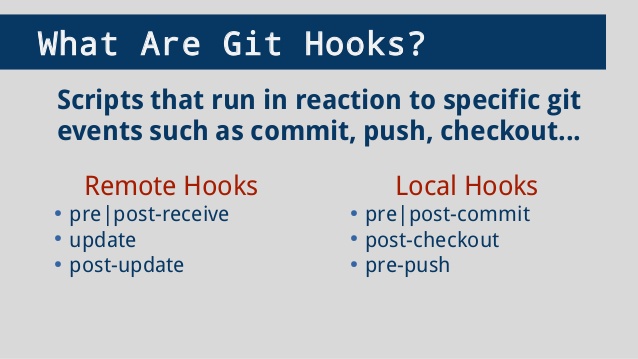
Git provides hooks, which are not but scripts that are executed in accordance with defined events such as committing, pushing, receiving, etc.
There may be various logical ways to classify hooks in git, but a couple of significant ones are:
- Post and pre-hooks: As the name suggests, post-hooks execute immediately after the event is completed, and pre-hooks execute before the event starts occurring. If the pre-hook returns a non-zero exit status, the event is aborted.
- Client side and server side hooks: Client-side hooks associate to developer side events like committing, merging, pushing, etc. Server sides hooks are associated with operations like receiving pushed commits.
We can use hooks to run checks, enforce rules (or constraints), perform redundant tasks at different stages in our development workflow.
Setting up the hooks
Setting up hooks in git is as straightforward as creating an executable script with a correct hook-name in the .git/hooksDirectory of a git repository. Sample hooks (with the names) are already provided in the directory. Documentation about various hooks and their names can be found here.
Since the hooks reside inside .git Directory, they are not checked out when you push to a remote repository hosting service like GitHub. To be able to do that, we need to change one git configuration, here’s how
$ git config core.hooksPath hooksNow we can define the scripts in the hooks directory instead. This will allow us to share the hooks with all the collaborators.
Client-side git hooks
Let’s see how we can use some of the client side hooks for our use case,
Using the pre-commit hook
We can use a pre-commit hook for
- Pointing out and auto fixing (if possible) any style mistakes
- Enforcing commit guidelines. Example, making sure the commit references the link in the issue tracker.
- Eliminating certain strings (like
pdb,printstatements, special characters, etc.) - Avoiding non-ASCII filenames, EOFs, etc.
Static code analysis tools like pylint, autopep8, coala, etc. provide capabilities to define style guidelines (or follow standard guidelines like PEP8), detect any violations to them, and if possible, suggest patches and even auto-fix.
Here’s our pre-commit hook, which takes all the python files to be committed, and runs autopep8 on them, auto fixing the violations to PEP8 (if any).
#!/bin/bash
# File: pre-commit
echo "Running pre-commit hook"
touched_python_files=`git diff --cached --name-only |egrep '\.py
Before we test this out, we need to install autopep8 using pip, and also add it to dev-requirements.txt to keep track of all the dev dependencies.
# File: dev-requirements.txt
pytest==4.1.1
autopep8==1.4.3
Now every time we commit and python files, our git hook will take care of running autopep8 over them. Actually, let’s try to commit our app.py and see what happens.
(venv) ➜  project git:(development) ✗ git add app.py
(venv) ➜  project git:(development) ✗ git commit -m "Test autopep8"
Running pre-commit hook
[file:autodeploy/app.py]
--->  Applying global fix for E265
--->  4 issue(s) to fix {'E302': {16, 10, 6}, 'E231': {14}}
--->  0 issue(s) to fix {}
[development 5d9a8a1] Test autopep8
 2 files changed, 2 insertions(+), 2 deletions(-)
So running autopep8 transformed our code to this! Neat, isn’t it?
Using pre-push hook
We can use the pre-push hook to,
- Run all the tests and make sure that they pass.
- Have strict code coverage checks to make sure the newly written code is tested properly.
#!/bin/bash
# File: pre-push
pytest --cov=autodeploy --cov-report term-missing tests/ || exit 1
If the tests fail, the script will return a non-zero exit status, and the code will not be pushed to the remote. Neat.
(venv) ➜  project git:(master) ✗ pytest --cov=autodevelop --cov-report term-missing tests/
======================================================== test session starts ========================================================
platform darwin -- Python 3.6.5, pytest-4.1.1, py-1.7.0, pluggy-0.8.1
rootdir: /Users/300041709/Desktop/cm/python_deployment_pipeline/project, inifile:
plugins: cov-2.6.1
collected 4 items

tests/test_app.py ....                                                                                                        [100%]

---------- coverage: platform darwin, python 3.6.5-final-0 -----------
Name                      Stmts   Miss  Cover   Missing
-------------------------------------------------------
autodevelop/__init__.py       0      0   100%
autodevelop/app.py           13      4    69%   10, 15-17
-------------------------------------------------------
TOTAL                        13      4    69%


===================================================== 4 passed in 0.24 seconds ======================================================
(venv) ➜  project git:(master) ✗
The current coverage is 69%. Although the only uncovered portion is the sort of boilerplate code for endpoints, but let’s make a strict coverage requirement of 100%.
#!/bin/bash
# File: pre-push
MIN_COVERAGE=100

pytest --cov=autodevelop --cov-report term-missing tests/ || exit 1
coverage report --fail-under=$MIN_COVERAGE || exit 1
The script emits a non-zero exists status if either the tests or the coverage-constraints fail. If we try to push now, the push should fail.
tests/test_app.py ....                                                                                                        [100%]

---------- coverage: platform darwin, python 3.6.5-final-0 -----------
Name                      Stmts   Miss  Cover   Missing
-------------------------------------------------------
autodevelop/__init__.py       0      0   100%
autodevelop/app.py           13      4    69%   10, 15-17
-------------------------------------------------------
TOTAL                        13      4    69%


===================================================== 4 passed in 0.23 seconds ======================================================
Name                      Stmts   Miss  Cover
---------------------------------------------
autodevelop/__init__.py       0      0   100%
autodevelop/app.py           13      4    69%
---------------------------------------------
TOTAL                        13      4    69%
error: failed to push some refs to '[email protected]:satwikkansal/python_automated_pipeline.git'
Now let’s add tests to cover the endpoints,
from autodeploy.app import compute_division, app

test_client = app.test_client()
test_client.testing = True


def test_root():
    response = test_client.get('/')
    assert(response.status_code == 200)
    assert(response.data.decode() == "Hello World!")


def test_get_division():
    response = test_client.get('/division?x=5&y=2')
    assert(response.status_code == 200)
    assert(response.data.decode() == "2.5")
Since we’ve covered every line, the coverage should be 100%. Let’s try to push now. It works! By the way, if we aren’t able to test some specific parts of the code due to some reason, we can add pragma comments to make up for the coverage.
Pull-request and code review
So the style guidelines have been taken care of, the code is thoroughly tested, the tests are clean, and now it’s time to raise a Pull request for others to review.
Ideally, it is also the code-reviewers responsibility to verify previous checks, so it makes sense to add similar checks on the Pull Request raising platform as well. Moreover, the integration part of the code should be tested here (running regressions, integration tests) to be assured that nothing breaks when this code is made live to production once it is merged.
Continuous Integration
Since it is very hard for the developers to test the project in various environments (different OS, python versions, etc.) using Virtual Machines, we can use Continuous Integration services like Travis-CI, CircleCI, and Appveyor to do this for us. We can specify multiple environments to run the project tests.
Other than that, we can perform all the checks during the builds. Including all the tests pass, following style guidelines, etc. The idea is to fail the build if any discrepancy is found, and to merge the code only when everything is green.
Adding Travis to our pipeline

Adding Travis to our project is pretty straightforward, we have to add a configuration file called travis.yml in our repository, and grant authorization to Travis to access our repository. The process is briefed here at their official website, and you can find the basics here.
# File: travis.yml
language: python

os:
    - linux

python:
    - 2.7
    - 3.4
    - 3.6

install:
  - pip install -r requirements.txt
  - pip install -r test-requirements.txt

script:
  - pytest
The above configurations tells Travis to execute our python project build on linux operating system, with versions 2.7, 3.4 and 3.6. The commands in install phase are executed before the commands in script phase which is where our project building/testing commands are written.
Ideally, testing the build for the python version and operating system of the production server is sufficient, but it doesn’t harm to test for other platform configurations since the developers might have different versions in local and we would like to avoid version specific issues anyway.
Integrating Codecov

Services like Codecov provide tools to measure coverage, generate reports, and take actions around it. To our existing .travis.yml we have added the command to install codecov in the install phase, and the codecov command in the after_success phase.
language: python

os:
    - linux

python:
    - 2.7
    - 3.4
    - 3.6

install:
  - pip install -r requirements.txt
  - pip install -r test-requirements.txt
  - pip install codecov

script:
  - pytest --cov=autodeploy --cov-report term-missing

after_success:
  - codecov
Additionally, we can also define a codecov.yml file to configure codcov features.
GitHub integrations in action
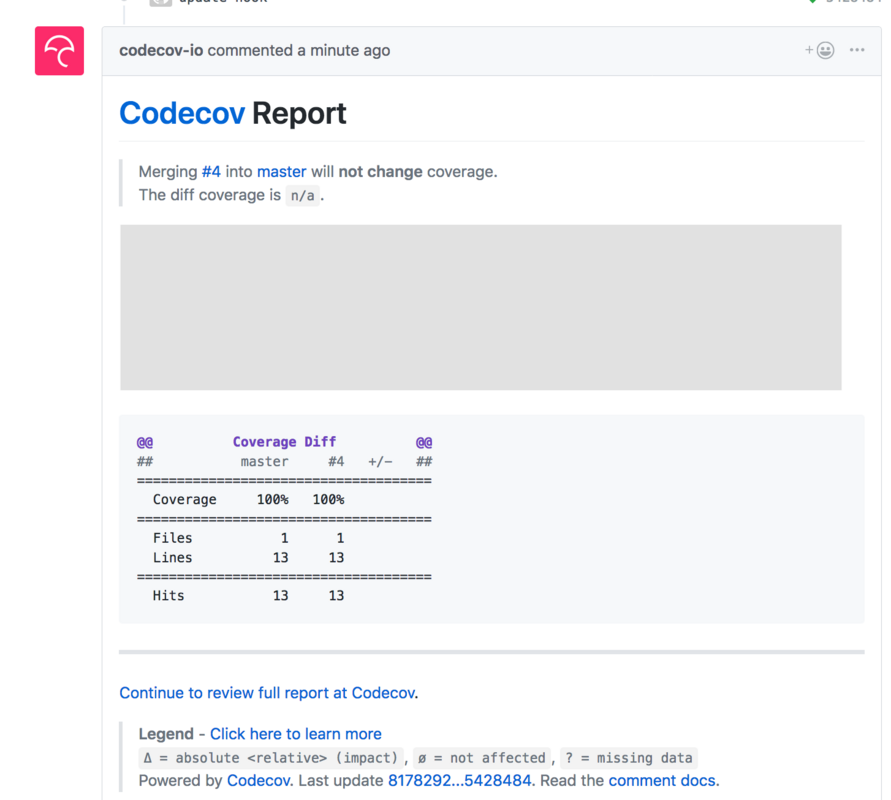
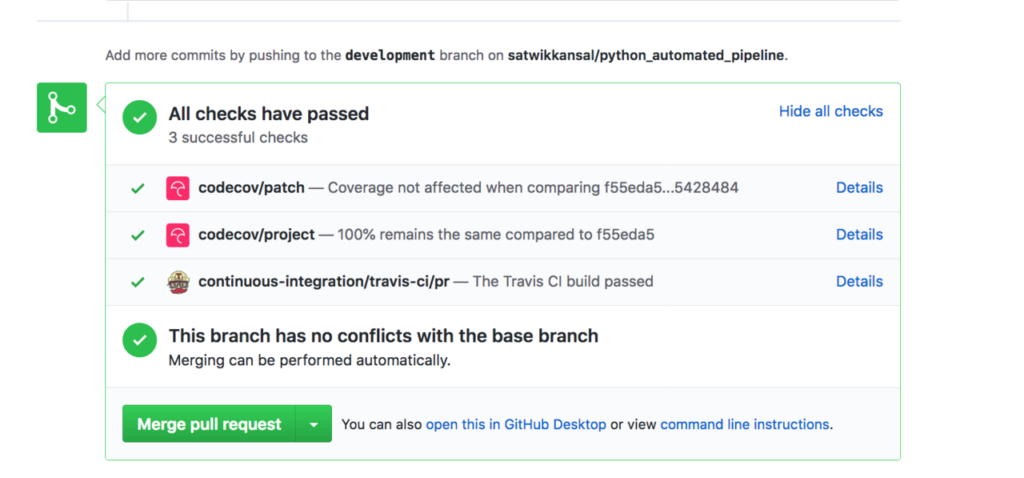
Here’s a Pull Request with both codecov and Travis integrated. You can see how a nice coverage report comments below, and the green checks are saying that everything succeeded. There’s also functionality to configure notifications, so that you’re notified when your build fails/succeeds.
Deploying the code
Now that the code has been merged and everything looks fine, it’s time to deploy our code and make the REST API live. The manual process for it can be logging into the server, cloning the service, and running some commands to get the production code serving. Let’s see if we can do better.
Deploying using server-side git hooks
We can use the post-receive hook to deploy the code in the master branch to production. To do this, we first need to initialize a bare git repository at the server.
Why a bare git repository? Because we don’t intend to work inside this remote repository and hence we don’t need any working tree to track stuff.
$ git init --bare ~/project_git
$ cd project_git/hooks
Here’s what our current post-receive git hooks example looks like:
#!/bin/bash
# File: post-receive
PROJECT_DIR="/home/project"
GIT_DIR="/home/git"
BRANCH="master"

while read oldrev newrev ref
do
    if [ "$ref" = "refs/heads/$BRANCH" ];
    then
        echo "Ref $ref received. Deploying ${BRANCH} branch to production..."
        git --git-dir=$GIT_DIR checkout -f $BRANCH
        cd $PROJECT_DIR && make setup prod-run && sh healthcheck.sh
    else
        echo "Ref $ref received. Doing nothing: only the ${BRANCH} branch may be deployed on this server."
    fi
done
The script will deploy our code if the master branch is pushes to the server remotely. We’ve transferred a few commands into a couple of make tasks to keep things more organized, here are the contents of our Makefile.
#File: Makefile
PROJECT_NAME=autodeploy

setup:
    pip3 install --user -r requirements.txt

prod-run:
    cd $(PROJECT_NAME) && gunicorn --bind 127.0.0.1:5000 app:app

dev-run:
    export FLASK_ENV=development
    export FLASK_APP=app.py
    cd $(PROJECT_NAME) && flask run
We have also added a simple health check script that makes sure the server is up and listening to the port. Here’s the content:
#!/bin/bash
# File: healthcheck.sh
URL=127.0.0.1
PORT=5000
if nc -vz $URL $PORT; then
    echo "Everything is fine!"
else
    echo "Something went wrong :("
    exit 1
fi
Let’s deploy our code now, and see if it works.
$ git remote add production [email protected]:project_git
$ git push production master
Doing this, will deploy our code on the remote machine, and starts the server in the production environment.
Here’s the final code, and our final directory structure
├── Makefile
├── autodevelop
│   ├── __init__.py
│   └── app.py
├── hooks
│   ├── post-receive
│   ├── pre-commit
│   └── pre-push
├── requirements.txt
├── test-requirements.txt
└── tests
    ├── __init__.py
    └── test_app.py
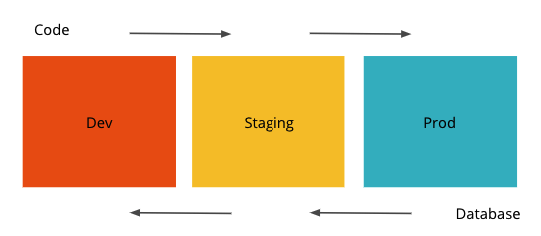
Deploying using CI services
Some CI services do also provide integrations to different cloud platforms like Heroku, AWS, etc. The idea is simple, if the build succeeds, deploy the code to the server. This feature is pretty useful for staging environments. For example, let’s say you made some front-end changes in your PR, the CI will take care of deploying these changes to a staging server so that the reviewer can visit it see the changes live.
Deploying using GitHub web hooks
What if we want to deploy our code to production once the Pull Request merges with the master branch? Well, that’s possible too! Just like git has hooks, Github also supports webhooks for various events (including Pull Request merge). The way it works is we’ll have to set up a listener endpoint on our server which will listen to the interested events sent the by GitHub and take actions accordingly.
Conclusion: Making Development Workflows Work for You
The post barely scratches the surface of different ways of automating your development workflow for better productivity. There are also more subtle workflows like the Git flow workflow, and the Forking workflow typically used by large projects with a release cycle and open source projects. However, the concepts discussed and solutions implemented will apply to all of these workflows; you just need to figure out what you need and what works the best for you!
Create My Own Development Server
Written and provided by:
Satwik Kansal – Deep Learning and Decentralized Applications
https://github.com/satwikkansal
|| true` if [ -n "$touched_python_files" ]; then autopep8 -riv $touched_python_files fi
Before we test this out, we need to install autopep8 using pip, and also add it to dev-requirements.txt to keep track of all the dev dependencies.
Now every time we commit and python files, our git hook will take care of running autopep8 over them. Actually, let’s try to commit our app.py and see what happens.
So running autopep8 transformed our code to this! Neat, isn’t it?
Using pre-push hook
We can use the pre-push hook to,
- Run all the tests and make sure that they pass.
- Have strict code coverage checks to make sure the newly written code is tested properly.
If the tests fail, the script will return a non-zero exit status, and the code will not be pushed to the remote. Neat.
The current coverage is 69%. Although the only uncovered portion is the sort of boilerplate code for endpoints, but let’s make a strict coverage requirement of 100%.
The script emits a non-zero exists status if either the tests or the coverage-constraints fail. If we try to push now, the push should fail.
Now let’s add tests to cover the endpoints,
Since we’ve covered every line, the coverage should be 100%. Let’s try to push now. It works! By the way, if we aren’t able to test some specific parts of the code due to some reason, we can add pragma comments to make up for the coverage.
Pull-request and code review
So the style guidelines have been taken care of, the code is thoroughly tested, the tests are clean, and now it’s time to raise a Pull request for others to review.
Ideally, it is also the code-reviewers responsibility to verify previous checks, so it makes sense to add similar checks on the Pull Request raising platform as well. Moreover, the integration part of the code should be tested here (running regressions, integration tests) to be assured that nothing breaks when this code is made live to production once it is merged.
Continuous Integration
Since it is very hard for the developers to test the project in various environments (different OS, python versions, etc.) using Virtual Machines, we can use Continuous Integration services like Travis-CI, CircleCI, and Appveyor to do this for us. We can specify multiple environments to run the project tests.
Other than that, we can perform all the checks during the builds. Including all the tests pass, following style guidelines, etc. The idea is to fail the build if any discrepancy is found, and to merge the code only when everything is green.
Adding Travis to our pipeline
Adding Travis to our project is pretty straightforward, we have to add a configuration file called travis.yml in our repository, and grant authorization to Travis to access our repository. The process is briefed here at their official website, and you can find the basics here.
The above configurations tells Travis to execute our python project build on linux operating system, with versions 2.7, 3.4 and 3.6. The commands in install phase are executed before the commands in script phase which is where our project building/testing commands are written.
Ideally, testing the build for the python version and operating system of the production server is sufficient, but it doesn’t harm to test for other platform configurations since the developers might have different versions in local and we would like to avoid version specific issues anyway.
Integrating Codecov
Services like Codecov provide tools to measure coverage, generate reports, and take actions around it. To our existing .travis.yml we have added the command to install codecov in the install phase, and the codecov command in the after_success phase.
Additionally, we can also define a codecov.yml file to configure codcov features.
GitHub integrations in action
Here’s a Pull Request with both codecov and Travis integrated. You can see how a nice coverage report comments below, and the green checks are saying that everything succeeded. There’s also functionality to configure notifications, so that you’re notified when your build fails/succeeds.
Deploying the code
Now that the code has been merged and everything looks fine, it’s time to deploy our code and make the REST API live. The manual process for it can be logging into the server, cloning the service, and running some commands to get the production code serving. Let’s see if we can do better.
Deploying using server-side git hooks
We can use the post-receive hook to deploy the code in the master branch to production. To do this, we first need to initialize a bare git repository at the server.
Why a bare git repository? Because we don’t intend to work inside this remote repository and hence we don’t need any working tree to track stuff.
Here’s what our current post-receive git hooks example looks like:
The script will deploy our code if the master branch is pushes to the server remotely. We’ve transferred a few commands into a couple of make tasks to keep things more organized, here are the contents of our Makefile.
We have also added a simple health check script that makes sure the server is up and listening to the port. Here’s the content:
Let’s deploy our code now, and see if it works.
Doing this, will deploy our code on the remote machine, and starts the server in the production environment.
Here’s the final code, and our final directory structure
Deploying using CI services
Some CI services do also provide integrations to different cloud platforms like Heroku, AWS, etc. The idea is simple, if the build succeeds, deploy the code to the server. This feature is pretty useful for staging environments. For example, let’s say you made some front-end changes in your PR, the CI will take care of deploying these changes to a staging server so that the reviewer can visit it see the changes live.
Deploying using GitHub web hooks
What if we want to deploy our code to production once the Pull Request merges with the master branch? Well, that’s possible too! Just like git has hooks, Github also supports webhooks for various events (including Pull Request merge). The way it works is we’ll have to set up a listener endpoint on our server which will listen to the interested events sent the by GitHub and take actions accordingly.
Conclusion: Making Development Workflows Work for You
The post barely scratches the surface of different ways of automating your development workflow for better productivity. There are also more subtle workflows like the Git flow workflow, and the Forking workflow typically used by large projects with a release cycle and open source projects. However, the concepts discussed and solutions implemented will apply to all of these workflows; you just need to figure out what you need and what works the best for you!
Use promo code “SKY95PYTHON” to save 95% off your first month. Offer is valid for new users only.
Create My Own Development Server
Written and provided by:
Satwik Kansal – Deep Learning and Decentralized Applications
https://github.com/satwikkansal


