
Are you looking for simple steps to install LEMP stack on your Ubuntu 20.04 server? Read this tutorial, as I am going to share steps to install LEMP stack on Ubuntu.
LEMP stack is a bundle of software tools that include Linux, Nginx, MariaDB, and PHP. All these tools are open source and free to use for anyone around the world. The combination of these tools make a powerful server stack which can be used to host high-performance websites. It is also a great way to install WordPress on your VPS server.
Let me tell you what these tools stand for in short.
- Linux: A very popular & commonly used Operating System
- Nginx: A web server
- MariaDB/MySQL: A database server
- PHP: Coding language used to build any kind of website. WordPress which is an open source platform is built using PHP.
Prerequisites
To set up the LEMP stack on Ubuntu 20.04, you need Ubuntu 20.04 installed on your server. Minimum server configuration should be
- 1GB Ram
- 25GB SSD Storage
- Root Access to the Server
You can easily create an Ubuntu 20.04 server on Skysilk for as low as 5$/month.
Let us proceed with this tutorial so you can set up & get it running quickly.
Connecting your Server
If you are running MacOS or Ubuntu operating system on your machine, you can use Terminal app to remotely connect with your server. Simply use the below command in your terminal app to login.
ssh root@your-server-ip
Step 1: Package Updates
It is a good practice to update the software packages and refresh the apt repositories by running a few commands on Ubuntu 20.04 OS. Here are the commands:
sudo apt update
sudo apt upgrade
Step 2: Nginx Web Server Installation
Follow the below steps with commands to install Nginx server. Nginx is a widely used server nowadays. To ensure, you install it properly on your computer, enter the following commands.
sudo apt install nginx
With this command, Nginx will be installed. But now we need to enable it to auto-start at boot time.
So, run the following command to auto-start Nginx.
sudo systemctl enable nginx
Now start Nginx with the below command
sudo systemctl start nginx
To check the status of Nginx, use the following command
sudo systemctl status nginx
This is the output you get when you check the status of Nginx
● nginx.service - A high performance web server and a reverse proxy server
     Loaded: loaded (/lib/systemd/system/nginx.service; enabled; vendor preset: enabled)
     Active: active (running) since Mon 2021-07-05 13:09:03 UTC; 1min 22s ago
       Docs: man:nginx(8)
   Main PID: 14447 (nginx)
      Tasks: 2 (limit: 464250)
     Memory: 2.9M
     CGroup: /system.slice/nginx.service
             ├─14447 nginx: master process /usr/sbin/nginx -g daemon on; master_process on;
             └─14448 nginx: worker process
If the status shows Enabled, it means Nginx will auto-start at boot time and is running properly. You can also check the memory consumption by Nginx and quit the command manually by pressing ‘q’ if it doesn’t quit automatically.
To check the Nginx version, use the below command
nginx -v
And it will show the output as follows:
nginx version: nginx/1.18.0 (Ubuntu)
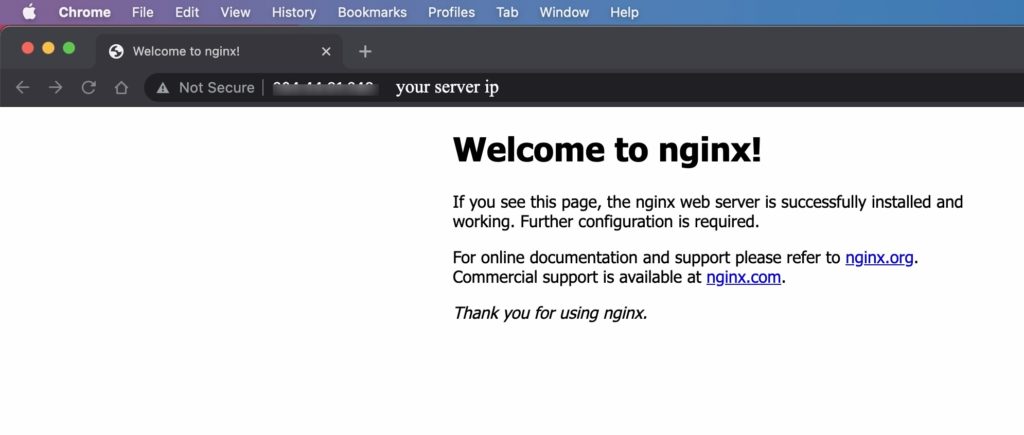
Next, type the public IP address of your Ubuntu 20.04 server which you can get from Skysilk VPS dashboard.
If the Nginx server is running properly, you will see “Welcome to Nginx!” page.
Just in case it does not work, the chances are that the UFW firewall is preventing Port 80.
To open TCP port 80 when using UFW firewall, use this command
sudo ufw allow http
To make Nginx user as the owner of the web directory, use:
sudo chown www-data:www-data /usr/share/nginx/html -R
Step 3: MariaDB Database Server Installation
You already know that MariaDB is an alternative for MySQL developed by the former members of MySQL. To install MariaDB on Ubuntu 20.04, enter the below commands.
sudo apt install mariadb-server mariadb-client
Now that MariaDB is installed, you can check its status.
systemctl status mariadb
The output should be like:
● mariadb.service - MariaDB 10.3.29 database server
     Loaded: loaded (/lib/systemd/system/mariadb.service; enabled; vendor preset: enabled)
     Active: active (running) since Mon 2021-07-05 13:13:28 UTC; 18s ago
       Docs: man:mysqld(8)
             https://mariadb.com/kb/en/library/systemd/
   Main PID: 15247 (mysqld)
     Status: "Taking your SQL requests now..."
      Tasks: 31 (limit: 464250)
     Memory: 66.3M
     CGroup: /system.slice/mariadb.service
             └─15247 /usr/sbin/mysqld
If the status shows enabled, it means MariaDB has started. But if not, you can use this command
sudo systemctl start mariadb
Just like Nginx, you can set MariaDB to auto-start at the boot time. Use this command to auto-start MariaDB at boot time.
sudo systemctl enable mariadb
Next, you need to run the post installation security script
sudo mysql_secure_installation
When asked about MariaDB root password, simply press Enter as there is no root password.
Now press Y to set the new root password and re-enter the password.
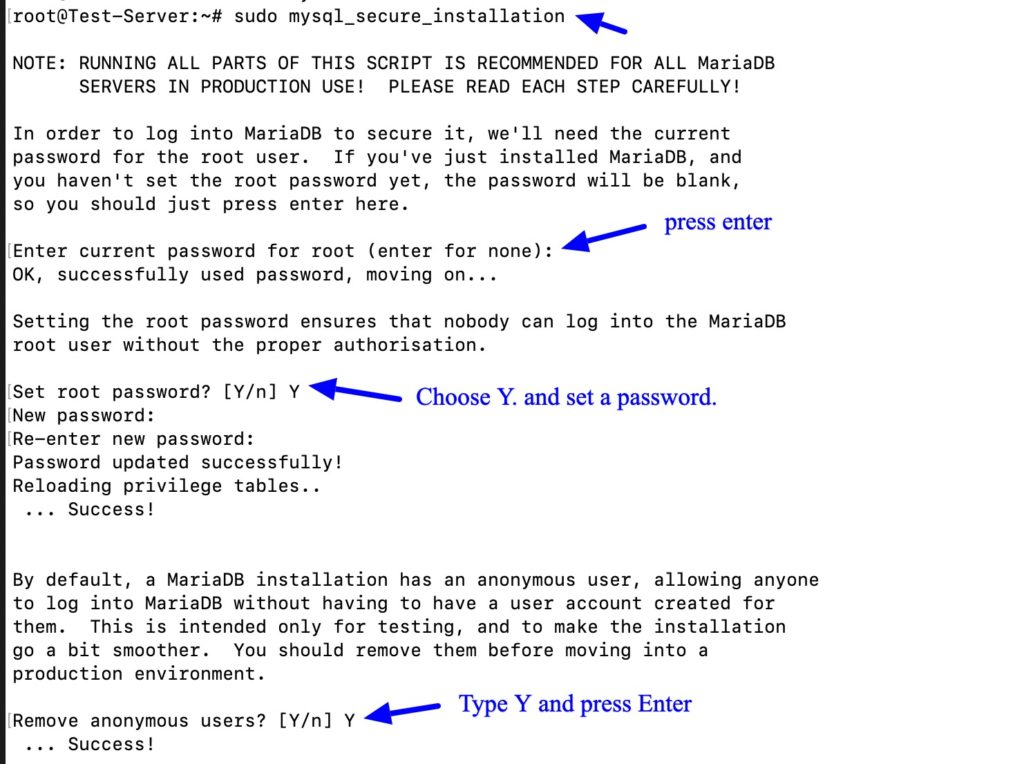
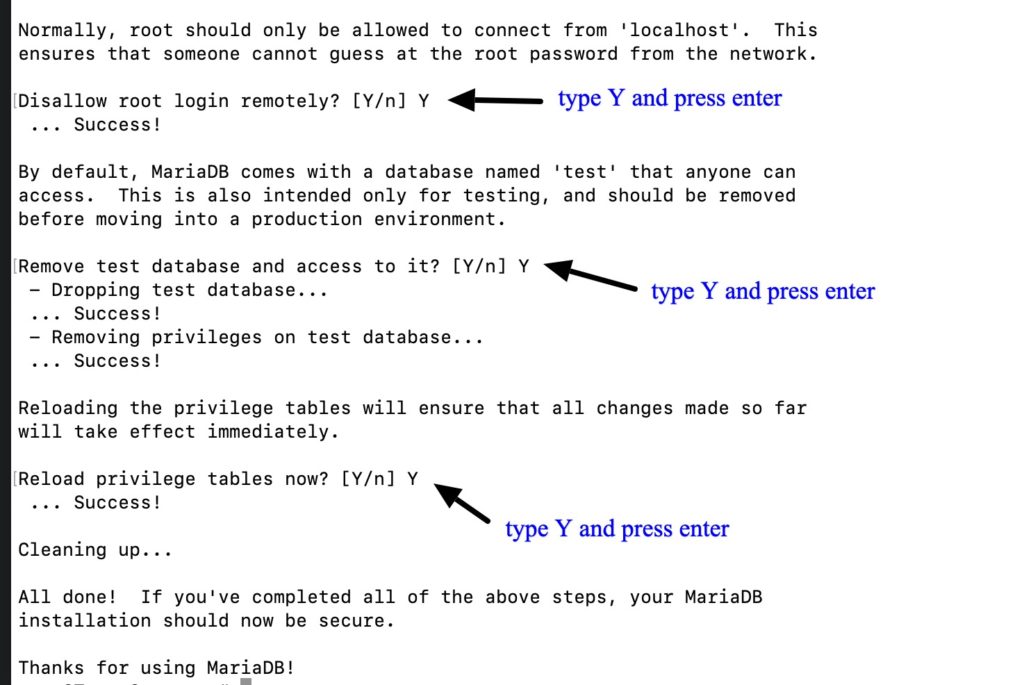
Now press enter for all the other questions. This includes removing anonymous users,disabling root login remotely, removing test databases & its access, and reloading privilege tables.
After completion of these steps, MariaDB installation is secured.
If you want to login MariaDB without root password, you can run the command below:
sudo mariadb -u root
To exit, simple enter
exit;
To check MariaDB version, enter:
mariadb --version
So you could see that MariaDB 10.3.22 has been installed successfully.
mariadb Ver 15.1 Distrib 10.3.29-MariaDB, for debian-linux-gnu (x86_64) using readline 5.2
Step 4: PHP 7.4 Installation
To install PHP 7.4 with some minor improvement over PHP 7.3, enter the following command:
sudo apt install php7.4 php7.4-fpm php7.4-mysql php-common php7.4-cli php7.4-common php7.4-json php7.4-opcache php7.4-readline php7.4-mbstring php7.4-xml php7.4-gd php7.4-curl
To ensure WordPress runs error free, install PHP extensions. Now use the following command to to start PHP 7.4-fpm
sudo systemctl start php7.4-fpm
Just like you had run commands to auto-start Nginx and MariaDB, you can enable auto-start PHP.
sudo systemctl enable php7.4-fpm
Now check the status of PHP
systemctl status php7.4-fpm
The output should be like:
● php7.4-fpm.service - The PHP 7.4 FastCGI Process Manager
     Loaded: loaded (/lib/systemd/system/php7.4-fpm.service; enabled; vendor preset: enabled)
     Active: active (running) since Mon 2021-07-05 13:21:45 UTC; 45s ago
       Docs: man:php-fpm7.4(8)
   Main PID: 26650 (php-fpm7.4)
     Status: "Processes active: 0, idle: 2, Requests: 0, slow: 0, Traffic: 0req/sec"
      Tasks: 3 (limit: 464250)
     Memory: 9.4M
     CGroup: /system.slice/php7.4-fpm.service
             ├─26650 php-fpm: master process (/etc/php/7.4/fpm/php-fpm.conf)
             ├─26651 php-fpm: pool www
             └─26652 php-fpm: pool www
Press Q if the above command doesn’t exit immediately.
Step 5: Setting up Nginx Server Block
The default server block cannot run PHP code so we create a Nginx server block that acts like a virtual host in Apache. Run the following command to remove the default symlink in sites-enabled directory.
sudo rm /etc/nginx/sites-enabled/default
To create a new server block, use the following command:
sudo nano /etc/nginx/conf.d/default.conf
Now paste the following text into the file to make Nginx listen on IPv4 port 80 and IPv6 port 80.
server {
  listen 80;
  listen [::]:80;
  server_name _;
  root /usr/share/nginx/html/;
  index index.php index.html index.htm index.nginx-debian.html;

  location / {
    try_files $uri $uri/ /index.php;
  }

  location ~ \.php$ {
    fastcgi_pass unix:/run/php/php7.4-fpm.sock;
    fastcgi_param SCRIPT_FILENAME $document_root$fastcgi_script_name;
    include fastcgi_params;
    include snippets/fastcgi-php.conf;
  }

 # A long browser cache lifetime can speed up repeat visits to your page
  location ~* \.(jpg|jpeg|gif|png|webp|svg|woff|woff2|ttf|css|js|ico|xml)$ {
       access_log        off;
       log_not_found     off;
       expires           360d;
  }

  # disable access to hidden files
  location ~ /\.ht {
      access_log off;
      log_not_found off;
      deny all;
  }
}
Save the file by Ctrl+x, type Y and enter to confirm. To close the file press Ctrl+X.
Now test the Nginx configuration.
sudo nginx -t
If the test is successful and your configuration files have proper syntax, it will show you a prompt like this.
nginx: the configuration file /etc/nginx/nginx.conf syntax is ok
nginx: configuration file /etc/nginx/nginx.conf test is successful
Reload Nginx if the test is successful
sudo systemctl reload nginx
Step 5: Test PHP
Create info.php file in the webroot directory to start testing PHP-FPM with Nginx web server.
sudo nano /usr/share/nginx/html/info.php
Now paste the below php code into the file
<?php phpinfo(); ?>
Close the file and open a new browser window. Then enter server-ip-address/info.php and replace server ip address with actual IP.
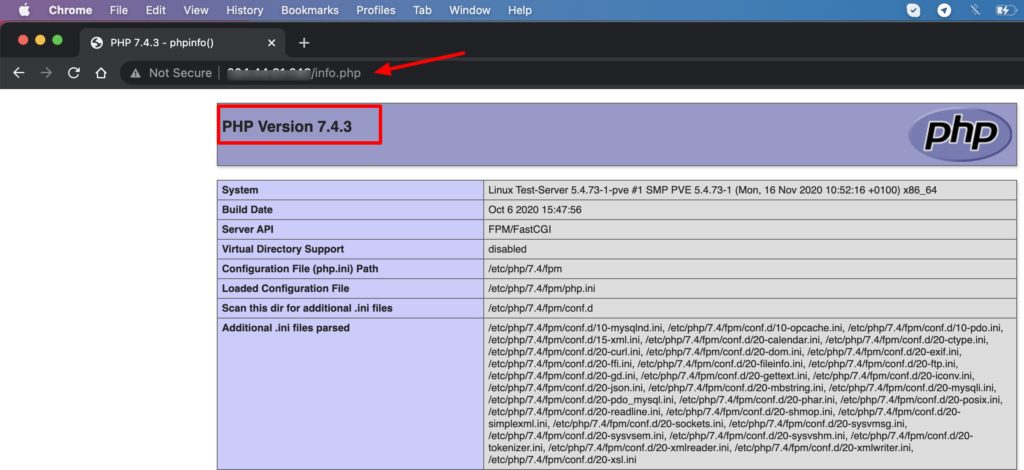
You can see the PHP information on your system.
So if you follow the steps mentioned in this tutorial, you can successfully install Nginx, MariaDB, and PHP 7.4 on ubuntu 20.04.
Do not forget to delete the info.php file for server security. Deleting this file prevents your file from getting hacked.
sudo rm /usr/share/nginx/html/info.php
If at any time you find an error, you can check the Nginx error log(/var/log/nginx/error.log). This would help you troubleshoot the issues quite effectively.
Nginx Auto-restart
If the Nginx process breaks, you can run the following command:
sudo systemctl restart nginx
You can alternatively restart Nginx automatically instead of manually typing this command. Create a separate directory to override the default system service.
sudo mkdir -p /etc/systemd/system/nginx.service.d/
Now create a file under the directory you just created.
sudo nano /etc/systemd/system/nginx.service.d/restart.conf
By adding the following command lines, Nginx will restart automatically If a failure is detected. The default value is 100ms which is too small, so change it to 5 seconds.
[Service]
Restart=always
RestartSec=5s
For changes to take effect, reload the system after closing the file.
sudo systemctl daemon-reload
Kill Nginx and check it with the following command:
sudo pkill nginx
Now check the Nginx status
systemctl status nginx
Conclusion
After following the steps in this tutorial, you can install LEMP stack on Ubuntu 20.04 successfully. You can use LEMP stack to host multiple websites on a VPS server by simply creating multiple server blocks.
About the author: Vashishtha Kapoor is a Web Hosting Expert and has over 5 years of experience in SEO, PPC, Website Management and WordPress development. Vashishtha writes about WordPress customizations, web design, server administration and ad-tech topics


