
Connecting a mobile app to a database is a critical foundation of many of the world’s most popular applications. User accounts, news updates, and statistics are just a few examples of the data one may wish to store and pull. In this post, we are going to look at how to connect an iOS app to a MySQL database using a free SkySilk VPS. Our iOS app will be a mock stock price tracker written with Swift, displaying the name and price of some made up stocks.
How to Connect an iOS App to a MySQL Database: Setting up a MySQL Server
The first step in learning how to connect an iOS app to a MySQL database is configuring the backend. We will need a MySQL server of course, but we will also need a simple API. Our app won’t connect directly to the database, instead, it will need to send requests to an API that we will write. This simple script will take the request, process it, and respond to the app. For this tutorial, we will be using a PhP script for our API. Since we will be using both MySQL and PhP, the LAMP stack template offered by SkySilk is perfect for us!
Once the VPS is ready to go, navigate to the IP address and view the control panel.
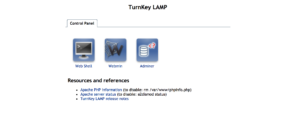
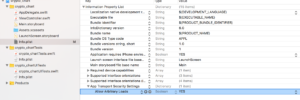
Click into Webadmin, and log in with the username ‘root’, and the password that you set when deploying the VPS. After logging in, navigate to the top toolbar -> servers -> MySQL Database Server. We are going to want to create a new database, so go ahead and click ‘Create a New Database’ on the top module. Here we are presented with a fresh database to configure.
For the sake of this tutorial, we are going to keep our database very simple. Name your database and table whatever you like, then move on to the fields. We will include an id field, which is the primary key and auto-increments. Then we will add two more fields, one for name and one for price.
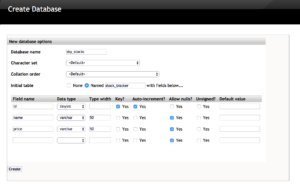
Click create, and the database will appear under the list of databases. Now click into the database, and you will be able to navigate into the table that was created as well. Click view data, and then add row. We will leave the id field blank, and make up a name and a price. Add as many rows as you would like, all of which will be displayed in our iOS app.

Here we can see that we added three rows to our table. Now our database has some data we can pull!
Configuring the Web API
The next step in learning how to connect an iOS app to a MySQL database is actually pulling our data. To do this, we will write a simple PhP script. Go ahead and open your favorite text or code editor, or Xcode since we will be using it to write our iOS app. Now add the following code:
Note: Make sure on line 4 the parameters match your configuration. Username will be ‘root’, password will be the MySQL password you set when deploying your VPS, and ‘dbname’ will be whatever you named your database. Save the file as “stock_service.php”.
This script will create a database connection, select all rows from the table we specified, and then output any results as a JSON array. It now needs to be added to our web server in order for our app to access it.
Navigate to the top toolbar again, tools -> File Manager. Using the top toolbar on the page, create a new directory, and name it ‘api’.
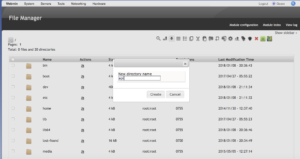
Click into the new ‘api’ directory and upload the ‘stock_service.php’ file. The script can now be called by its address on the web. If you want to test your script, navigate to ‘http://your_vps_ip_address/api/stock_service.php’, of course replacing ‘your_vps_ip_address’ with the IP of your VPS. If all goes well, you should see something like:
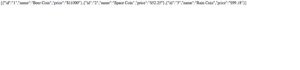
This is the JSON array that the script outputs at the very end. Now we just need to build our iOS app which will pull this data and display it in a much more aesthetically pleasing format.
How to Make an iOS App to Display the Data With Swift
Now for the last section of how to connect an iOS app to a MySQL database. Open Xcode and create a new project. Select single view app, name it, select Swift as the language, and create. Next, navigate to your app’s Info.plist file in the project hierarchy. Add a new row and type ‘App Transport Security Settings’. After that, click the arrow on the new row down, and add an item inside of it. Type ‘Allows Arbitrary Loads’, and set the value to yes.
This allows our app to pull data from an outside source. Now, we need to set up the basic UI.
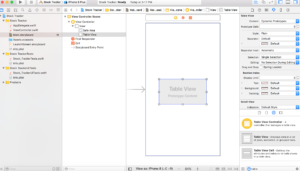
Navigate to Main.Storyboard. There should be a view controller present. In the object library in the bottom right-hand corner, type in ‘Table View’ in the search bar, and then drag and drop a table view onto your view controller.
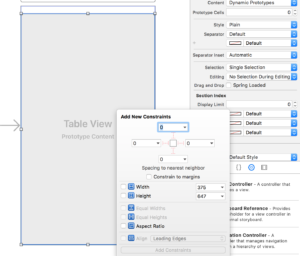
Now click on the table view object. We are going to make this a full-screen table view, so click on the ‘add new constraints’ in the bottom toolbar (the box with two lines on either side of it). Set all of the spacing constraints to 0, and your table view will match the size of the view controller’s view.
Navigate back to the object library and drag a table view cell onto the table view. In the attributes inspector, find the Identifier field and give your cell a name. We will use the name ‘stockCell’ in our app. We will use this identifier later when we populate our table view.
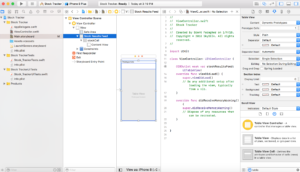
The final step in the storyboard file is to link our table view to our Swift code file. Click the assistant editor in the top right toolbar. Finally, control + click on the tableview in the storyboard file and drag to view controller class in the code file, and give your table view a name.
Now we can reference our table view in our code. Speaking of code, let’s build the functionality to pull and display our data.
Developing an app? Read about issue tracking with GitLab and other Git repositories
Creating the Data Models
We are going to create two new classes: one to pull the data and one to store it. Create two new files. Make sure they are a subclass of NSObject, and set to the Swift language. Name one FeedModel, and the other StockModel. FeedModel will pull the data for us, and StockModel will store the data for us.
Add the following code to your StockModel Swift file:
import UIKit

class StockModel: NSObject {

    //properties of a stock

    var name: String?
    var price: String?


    //empty constructor

    override init()
    {

    }

    //construct with @name and @price parameters

    init(name: String, price: String) {

        self.name = name
        self.price = price


    }


    //prints a stock's name and price

    override var description: String {
        return "Name: \(String(describing: name)), Address: \(String(describing: price))"

    }

}
This class has the properties that we will assign to each stock once we have the relevant data.
Now we can move on to the Feed Model. Add the following code to the Swift file:
import Foundation

protocol FeedModelProtocol: class {
    func itemsDownloaded(items: NSArray)
}


class FeedModel: NSObject, URLSessionDataDelegate {


    weak var delegate: FeedModelProtocol!

    let urlPath = "http://64.52.86.78/api/stock_service.php" //Change to the web address of your stock_service.php file

    func downloadItems() {

        let url: URL = URL(string: urlPath)!
        let defaultSession = Foundation.URLSession(configuration: URLSessionConfiguration.default)

        let task = defaultSession.dataTask(with: url) { (data, response, error) in

            if error != nil {
                print("Error")
            }else {
                print("stocks downloaded")
                self.parseJSON(data!)
            }

        }

        task.resume()
    }
The first step is to create a protocol. This is how we will let our view controller know that we have data for it to display. Next, we define the URL path for our web service that we wrote earlier. Finally, we implement a function to actually get the data from our script.
You may notice that there is an error stating we don’t have a function called ‘parseJSON’, so let’s add it. Add this code to the remainder of the FeedModel Swift File:
func parseJSON(_ data:Data) {

        var jsonResult = NSArray()

        do{
            jsonResult = try JSONSerialization.jsonObject(with: data, options:JSONSerialization.ReadingOptions.allowFragments) as! NSArray

        } catch let error as NSError {
            print(error)

        }

        var jsonElement = NSDictionary()
        let stocks = NSMutableArray()

        for i in 0 ..< jsonResult.count { jsonElement = jsonResult[i] as! NSDictionary let stock = StockModel() //the following insures none of the JsonElement values are nil through optional binding if let name = jsonElement["name"] as? String, let price = jsonElement["price"] as? String { print(name) print(price) stock.name = name stock.price = price } stocks.add(stock) } DispatchQueue.main.async(execute: { () -> Void in

            self.delegate.itemsDownloaded(items: stocks)

        })
    }
}
Here we are taking the JSON data we received from our web service and parsing it. Then, we create a ‘stock’ object for each item that was in the JSON array and assigning the relevant properties to it. Finally, we add each stock into an array named ‘stock’ which we send to our view controller with our protocol function.
Displaying the Data
Now that we have our stock objects ready, the final step is to display them to the user. Navigate back to the ViewController Swift file and make sure it looks like this:
import UIKit

class ViewController: UIViewController, UITableViewDataSource, UITableViewDelegate, FeedModelProtocol  {

    //Properties

    var feedItems: NSArray = NSArray()
    var selectedStock : StockModel = StockModel()
    @IBOutlet weak var stockResultsFeed: UITableView!

    override func viewDidLoad() {
        super.viewDidLoad()

        //set delegates and initialize FeedModel

        self.stockResultsFeed.delegate = self
        self.stockResultsFeed.dataSource = self

        let feedModel = FeedModel()
        feedModel.delegate = self
        feedModel.downloadItems()

    }

    func itemsDownloaded(items: NSArray) {

        feedItems = items
        self.stockResultsFeed.reloadData()
    }

    func tableView(_ tableView: UITableView, numberOfRowsInSection section: Int) -> Int {
        // Return the number of feed items
        return feedItems.count

    }

    func tableView(_ tableView: UITableView, cellForRowAt indexPath: IndexPath) -> UITableViewCell {

        // Retrieve cell
        let cellIdentifier: String = "stockCell"
        let myCell: UITableViewCell = tableView.dequeueReusableCell(withIdentifier: cellIdentifier)!
        // Get the stock to be shown
        let item: StockModel = feedItems[indexPath.row] as! StockModel
        // Configure our cell title made up of name and price
        let titleStr: String = item.name! + ": " + item.price!
        print(titleStr)
        // Get references to labels of cell
        myCell.textLabel!.text = titleStr

        return myCell
    }

}
In viewDidLoad, we set our table view’s delegate and data source to the view controller. Then, we initialize a new feed model object and call the download function.
Once we receive a response, the protocol function is called, we receive our stock array, and refresh the table view. For each stock item, we take the name and price and create a string to assign to our cell label.
Build and run your app, and you should see all the data from your MySQL database!

How to Connect an iOS app to a MySQL Database: Closing Thoughts
Now that we’ve learned how to connect an iOS app to a MySQL database, there are several things to do next:
- Write functionality to send data to the MySQL database
- Write functionality to edit rows
- Add the ability to delete rows
A final note to consider is security. While this app is functional and good for testing purposes, it is not secure and ready for live users. Security itself is a huge topic that should be researched and properly implemented before allowing live users to access any databases you control.
Deploy a Self Hosted LAMP Server
That’s it for this post. Well done making it through, and now you know how to connect an iOS app to a MySql Database!


