
Apache is one of the most popular web servers used on the internet today. It is a reliable software that is updated frequently and scaled for any sized site. As a result, serving thousands of visitors every day is not a problem for a website utilizing Apache Web Server. Here, we will look at how to install Apache Web Server on a Linux VPS step-by-step.
Introduction to Apache Web Server
What is Apache Web Server?
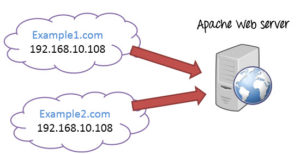
The Apache Web Server is an open-source HTTP server for modern operating systems including UNIX, Linux, and Windows. It is an open source software that is developed and maintained by the Apache Software Foundation. The foundation is an open community of developers. Furthermore, the Apache Web Server is a secure, efficient and extensible server. Apache provides HTTP services in sync with the current HTTP standards. Finally, it was launched in 1995 and has been the most famous web server on the Internet since 1996.
Advantages of Apache Web Server
- Apache Web Server is an open source software which available for anyone to download without any cost.
- It is a great tool to serve Perl and python as both servers support PhP.
- Apache has a very long history of reliability and performance.
- Apache is compatible with numerous hardware configurations and operating systems. It can run on Linux, MacOS, Windows NT, Unix and many other operating systems.
See Also: How to Setup a LAMP Stack Server with a SkySilk VPS
How to Install Apache Web Server on Linux VPS
The process to install Apache Web Server on a Linux VPS is short and sweet. As a result, it does not require in-depth programming skills. In addition, its repository is already available in all the major Linux distributions by default.
In order to install Apache HTTP web server on a Linux VPS, first, log in using the sudo or root user privileges and then run the command below on the command line terminal.
For Ubuntu:
sudo apt-get install apache2
For RHEL/CentOS:
sudo yum install -y httpd
This will install the latest Apache web server version 2.4.6 on the server along with its required dependencies.
Apache Web Server Configuration
Now that Apache is installed, it’s time to configure it to serve data. Edit the main Apache configuration file using a command line editor under the below path.
For Ubuntu:
vim /etc/apache2/apache2.conf
For RHEL/CentOS:
vim /etc/httpd/conf/httpd.conf
Now save and close the configuration file using `:wq!` after making the required changes in the configuration file.
Run Apache Web Service
To start Apache services, you can use below commands in the command line terminal for the Linux Operating System in use.
For Ubuntu:
First, run the command to start its service and enable it to auto start at boot. Next, check the status of the service, which should be running.
systemctl start apache2.service
systemctl enable apache2.service
systemctl status apache2.service
For RHEL/CentOS:
In Red Hat Enterprise Linux Operating Systems, you can start, enable and then check the status of Apache web service using the following commands.
systemctl start httpd.service
systemctl enable httpd.service
systemctl status httpd.service
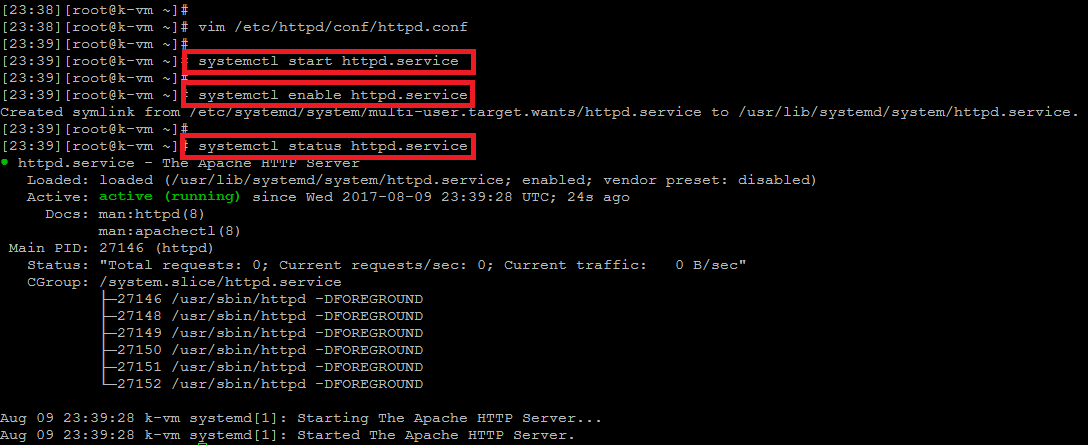
As a result, we can see that Apache HTTP service is up and running. Therefore, we can also check its port listening state using below command.
netstat -tlnp | grep httpd
tcp 0 0 0.0.0.0:80 0.0.0.0:* LISTEN 27146/httpd
Testing Apache
Now the Apache is running on the Linux VPS. Lastly, test the web page by opening a browser and navigating to the IP address assigned to the VPS.
http://your_server_ip/
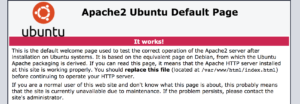
If the test page of Apache HTTP Server is displayed properly, then the installation was a success!. Finally, if there are any issues while accessing the web page, make sure to check its logs under `/var/log/httpd/` directory.
In Conclusion – Installing Apache Web Server
Congratulations! You now know how to install Apache Web Server and as a result, configure it so that it works with a limitless number of applications and use cases.


