
Location-Based Slack Status: Using Automation to Update Slack Status by Location (Updated)
Why update your Slack status manually when you can have automation do it for you? Better yet, why not create automation to set a location-based Slack status? There hasn’t been an easy way to set a location-based slack status up until now, but we have figured out a method that works while requiring no coding experience whatsoever! Being able to update a slack status based on location can be an extremely useful tool to help optimize any workflow, click inside to see how to easily set up automatic slack statuses based on location using IFTTT, Zapier, and Slack app integrations.
Optimize Your Workflow: Updated Slack Status by Location
What is Slack?
 For those who may be unfamiliar, the Slack App is a “freemium” chat messenger that is gaining in popularity as a superior Skype alternative, due in part to features like slack app integrations and slack plugins.
Slack also includes threaded messaging, separate public/private channels that can be created in seconds, built-in reminders, custom slack statuses, and many other tools to help keep organizations on track. Using your Slack status to display availability is a really useful tool, and being able to automate that can really help keep teams on track. Some of the best slack apps are the result of user collaboration.
In our case, we want to be able to set a location-based Slack status automatically!
How to set a Location-Based Slack Status
In order to set a location-based slack status, we will need to utilize a few Slack App integrations, namely, IFTTT (If This Then That) and Zapier. IFTTT will be handling the location-based tracking, and Zapier will be taking care of the Slack status automation. Together they will be working harmoniously to automatically create a custom, location-based Slack status workflow.
This guide is meant for entry-level users and should only take about 10-15 minutes to get working.
PART 1 (of 2) – Using IFTTT to set location-based tracking
Why IFTTT?

![]()
IFTTT is an abbreviation for If This, Then That. Also known in the coding world as an “if/else” statement to represent an input and resulting action, IFTTT is a website/mobile app that allows for non-coding savvy users to create automated actions for many different workflows.
In our case, the IFTTT statement is: IF my location changes THEN update my Slack status.
Step 1 – Login to IFTTT
To set up location-based slack statuses we will first need to create an IFTTT Applet to track our location and send a corresponding message to Slack. The process is very simple. If you don’t have an IFTTT account you can create an IFTTT account for free.
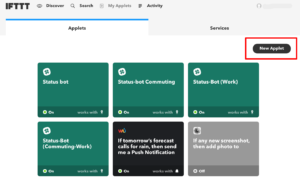
Step 2 – Create a New IFTTT Applet
Next, create an IFTTT Applet by clicking “New Applet ” on your dashboard:
Step 3 – Set your IF trigger to Location
Now we want to set up our location tracking. Location tracking can be triggered when you enter an area, exit an area, or if you exit/enter the same area. This is where you can get creative! If you want to set multiple Slack statuses, you will need to create a new Applet for each location you want to trigger.
- Choose IF
- Search for and select Location
- Choose your trigger to react based on when you enter or exit a certain area
- Set your Geofence to determine the trigger area
- Press Create Trigger to move on to the final part of the applet creation
Step 4 – Set your THEN trigger to Slack
Prerequisite: You will need to have a private Slack channel set up and you will also need to ensure Slack and IFTTT are connected prior to this step.
We recommend something like #status-bot for the name of your private channel, you can add private channels to your Slack channel directly in the Slack app.
Authorize IFTTT to connect with your Slack channel when prompted via Slack App integrations. (You may need to contact your Slack server admin to have them add the IFTTT as a Slack app integration for you.)
- Select THEN to set your next action
- Search for and select Slack. You will need to Authorize IFTTT to connect with Slack if this is the first time.
- Set Select Channel to Private Groups
- Select your private channel (e.g. #status-bot) from above
- Change your Message to something simple, like “I’m Home”, or “I’m at work” or “I’m out and about.” This exact message string is what we will be looking to filter later, so remember what you have set here.
- Delete the Title, Title URL, and Thumbnail (these are for aesthetic purposes, since these messages are going to be pushed to a private channel there is no need for them)
- Press Create Action
- Label your Applet something easy to remember so you know which trigger is which (e.g. “Status-Bot (HOME)” for when you are at home).
- Click FINISH and you’re done! On to Zapier configuration!
Step 5 – Rinse & Repeat (optional)
Repeat this process for each type of trigger you want to create, for example, you will need to create a separate Applet to track each of the following scenarios:
- When you Arrive Home (“I’m Home”)
- When you Leave Home (“I’m Out & About”)
- Similarly, When you Arrive at Work (“I’m at work”)
- Or, When you Leave Work (“I’m Out & About”)
In this case, we will want to remember the following trigger words based on the above phrases:
HOME, WORK, and ABOUT <—- Remember these words (or the words you chose) for later, we will need them for Part 2, Step 3 below.
PART 2 (of 2) – Using Zapier to recognize location changes and Update Slack Status by Location
Now that you have your IFTTT Applet(s) configured you can move on to Zapier.
Why Zapier?
![]()
Zapier is a powerful automation platform that allows users to connect hundreds of different app types to instantly create any type of workflow on the go. In our case, we are going to use Zapier to create a “Zap” that will listen to input from our IFTTT Applet and update our Slack status accordingly.
Step 1 – Login to Zapier
In order to automatically update Slack status by location, we will need to create a Zapier “Zap” that talks to our Slack app accordingly. If you don’t have a Zapier account you can create a Zapier account for free.
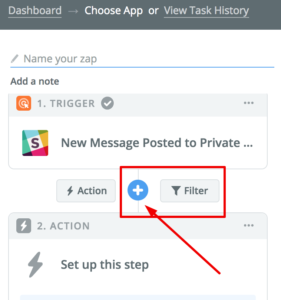
Step 2 – Create a new Zapier Zap – Connect Slack to Zapier to Update Slack Status by Location
- Choose MAKE A ZAP! on the top right of your Zapier dashboard
- Search for and Choose Slack as your Trigger. You will need to Authorize Zapier to connect to Slack if this is your first time.
- Select Show Less Common Options at the bottom of the page.
- Set your Slack Trigger as New Message Posted to Private Channel
- Test the connection between Zapier and the selected Slack channel by following the on-screen instructions. Press Save + Continue.
- Select the same private channel you set for your THEN trigger in IFTTT above
- Set Trigger for Bot Messages? to YES
- Pull in samples, select one, and press Continue so Zapier has data to parse when creating your Zap filters in the next steps. When doing this for the first time you may need to manually type a message into your private slack channel in order for Zapier to respond.
Step 3 – Create filter rules for your Zapier Zap
This is where those important words to remember from Part 1 come back in:
- Click the + button on the left sidebar to expand the options and choose Filter
- Press Save + Continue for the Only Continue If… step of the Filter creation
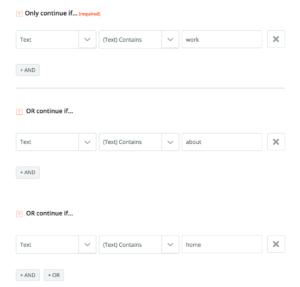
- Create filter rules for each trigger word being sent by IFTTT messages to your private slack channel.
- Choose Text for the first drop-down (this tells Zapier what content to search, in this case, we want the text in the message body)
- Choose Text Contains for the second drop-down (this tells Zapier to only continue if the text is found in the channel, i.e. when your location changes prompting IFTTT to send a message.)
- Input the exact word/phrase you chose in the text field at the end.
- Press the OR button to copy the process and create a filter for each trigger word/phrase.
Using our example words from before, our filter would look something like the following:
Create custom Zap filters - Press Continue once the Test is complete. If you manually entered one of your trigger words during step 8 above then you should see that your Zap would have run successfully.
In this next section, we will need to create 2 Action events, one to automatically update Slack Status text and another to automatically update Slack Status Emoji.
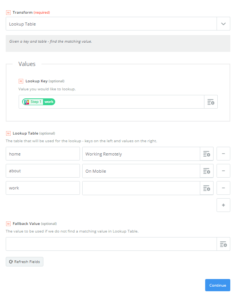
Step 4 – Zapier Action 1 – Create a Formatter Action for your Zapier Zap to Automatically Update Slack Status Text
Now, create a new Zapier action for this Zap:
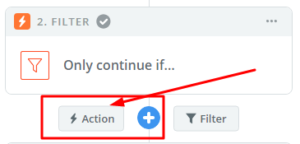
- Set your new action by choosing Formatter
- Choose Utilities as the option for the action to be performed by Formatter and press continue
- Choose Lookup Table from the drop-down selector
- In the Values section, click the button on the right of the form to produce a drop-down menu. Choose New Message Posted to Private Channel (then select “Text”) as the Lookup Key.
- In the Lookup Table, set the first column to match the specific word you want to trigger. For example, if you want to monitor when you arrive at work, input the trigger word you set to be sent from IFTTT to your private slack channel when you get to work.
- Moving on to the second column, input whatever text you want to have your Slack Status changed to. For example, type “Working Remotely” if that’s what you want your Slack status to say when you arrive at home.
*(Leave this blank if you don’t want to display a text status, eg. when you are online at work and available.) - Repeat steps 1-7 for each Slack status you want to have as an available option.
- Skip the Fallback Value field and press Continue.
Our finished Formatter Action for Slack Text updates should look something like this:
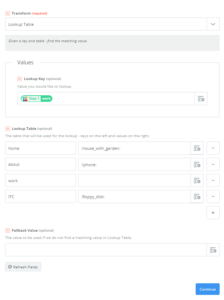
Step 5 – Zapier Action 2 – Create a Formatter Action for your Zapier Zap to Automatically Update Slack Status Emoji (optional)
Slack status text is great, but how about showing some personality with matching emojis! Slack allows users to set emojis to be displayed along with a text status. To have your Slack status emojis automatically update build the following action. (If you aren’t concerned with Slack emojis you can skip this step and move onto the next section.
- Set a new action by choosing Formatter, similar to what we did above. Steps 1-5 are essentially the same:
- Choose utilities as the option for the action to be performed by Formatter and press continue
- Choose Lookup Table from the drop-down selector
- In the Values section, click the button on the right of the form to produce a drop-down menu. Choose New Message Posted to Private Channel (the select “Text”) as the Lookup Key.
- In the Lookup Table, set the first column to match the specific word you want to trigger. For example, if you want to monitor when you arrive at work, input the trigger word you set to be sent from IFTTT to your private slack channel when you get to work.
- Different from above, in the second column input the specific Slack emoji you want your status to display when triggered. Slack emojis use
:slack_emoji:
to lookup emojis, so you will need to navigate to slack and find the name of the exact emoji you want to use. For example, :+1:is the emoji code for Thumbs Up emoji. - Repeat steps 1-7 for each Slack status you want to have as an available emoji option.
- Skip the Fallback Value field and press Continue.
A finished Emoji Formatter Action will look something like this:
Homestretch Recap
So to review, up to this point we should have:
- Slack, IFTTT, and Zapier all connected via slack app integration
- An IFTTT Applet configured to track locations and send triggers to a private slack channel
- A Zapier Zap with a Filter setup to listen for specific trigger words sent to our private slack channel
- The same Zapier Zap with a Formatter Action to update our Slack Status’s displayed text
- The same Zapier Zap with another Formatter Action to update our Slack Status’s displayed emoji
Now we are ready for the final step; finishing the Zap to get it to update Slack status by location.
Step 6 – Last Zapier Action – Update Slack Status by Location
All that is needed now is to have our Zapier Zap update our Slack Status by location based on all of the rules we have set above. To do that:
- Create one more Zapier Action for this same Zap
- Select Slack as your Action App and press Continue
- Set the Slack Action to Set Status and press Continue
- Connect Slack + Zapier by authenticating your Slack account, then Press Continue
- Set the Slack Status Text to Step 3 using the drop-down button on the right. (Click the drop-down, then Select (3) Utilities, then select Text)
- Set the Slack Status Emoji to Step 4 using the drop-down on the right. (Click the drop-down, then Select (4) Utilities, then select Text)
- Press Continue
- Press Finish
Final Result – Automatic Location-Based Slack Status
If you’ve configured everything correctly, your final zap will look something like this:
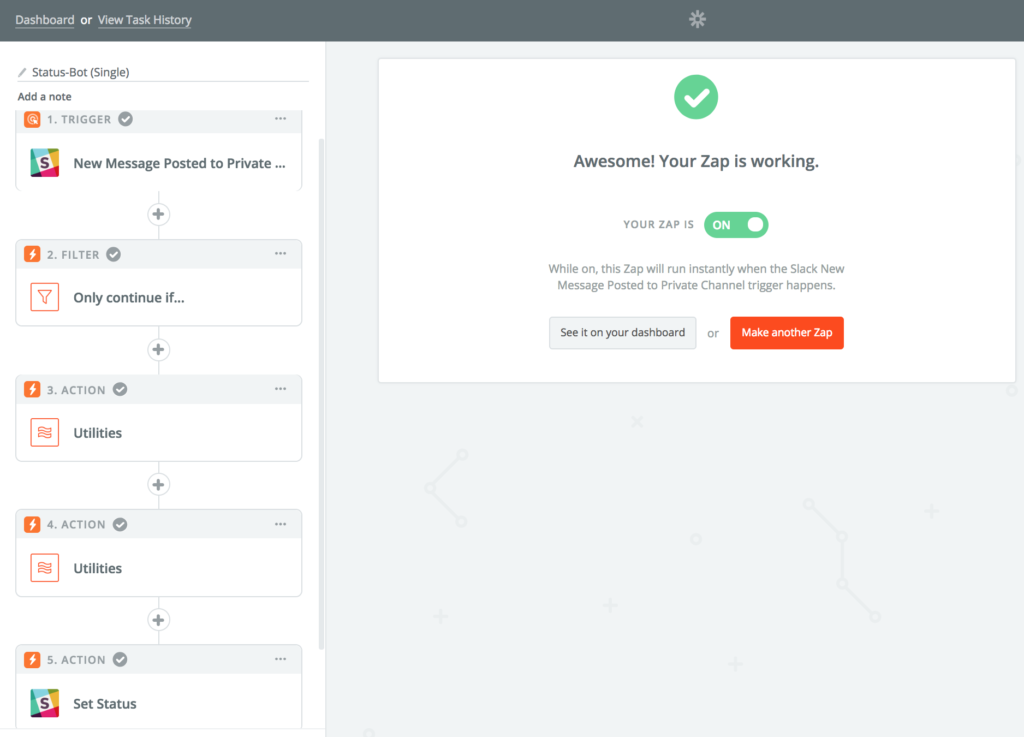
That’s all there is to it! Now you can have automatic location-based slack status updates running in the background. By using IFTTT and Zapier, we have created a powerful Slack App integration perfect for location-based Slack status updates. This can be used to boost productivity and keep your team members aware of your availability.
Other Slack App Integrations for your Location-Based Slack Status
You could even take it one step further by pairing this Slack App integration with others. For example, adding a step to update your Slack status based on time of day + location (so if you are away from work from 12pm-1pm you can set a specific “At Lunch” status update). Building on top of that, you could, in theory, modify the above steps even further. You could build a Zap that can display the name of the specific task you are working on by connecting it to one of Zapier’s many task management software apps. The possibilities are nearly endless when it comes to building on your location-based Slack status automation.
We certainly think being able to update Slack status by location is one of the best Slack apps available right now. Especially when paired with other Slack App integrations.
READ MORE: 10 Advantages to Automated Virtual Computing


