Creating a WordPress Child Theme allows you to better customize your website for your needs without losing updates on the parent theme. After all, we all know that WordPress is one of the most used content management systems for blogs, eCommerce sites, corporate websites, and various platforms. Therefore, having the right tools combined can help you run things smoothly and efficiently. An example of these tools is a combination of WordPress plugins, a parent theme, a child theme and custom layouts for single posts.
Why a Child Theme
Once you finalize a WordPress theme, it is crucial to stick to a design framework to build a brand for your website. However, as you build and grow the website, there are some edits you need to make into the theme’s code to be able to customize the layout for your ever-increasing needs. You can edit the respective PHP or CSS files of the WordPress theme and get things done.
But, what happens when you update the theme in the future?
All the code that you edited will be wiped out and you might get in trouble as the custom features you added (inside the theme’s core files) won’t be working at that moment.
To be on the safer side, creating a child theme for all your customization is the best option.
Prerequisites
- Before performing any major change in your website, backup your VPS server.
- If possible, make any changes in your staging server and then push it to a live server.
What is a Child Theme
- A WordPress child theme uses all the files (PHP scripts, CSS files and javascript) from the parent theme.
- If you add a new single.php in your child theme, your WordPress website will use single.php from the child theme directory and ignore single.php from the parent theme.
- When you update your parent theme, you won’t lose any custom code that you added to the child theme.
How to Create A WordPress Child Theme
To start with, deploy a WordPress site. We have installed and activated the “Generatepress” theme on it.
The Basic Setup
First, let’s create a new folder in the themes folder. The name of the folder will be the same as the parent theme name appended with -child.
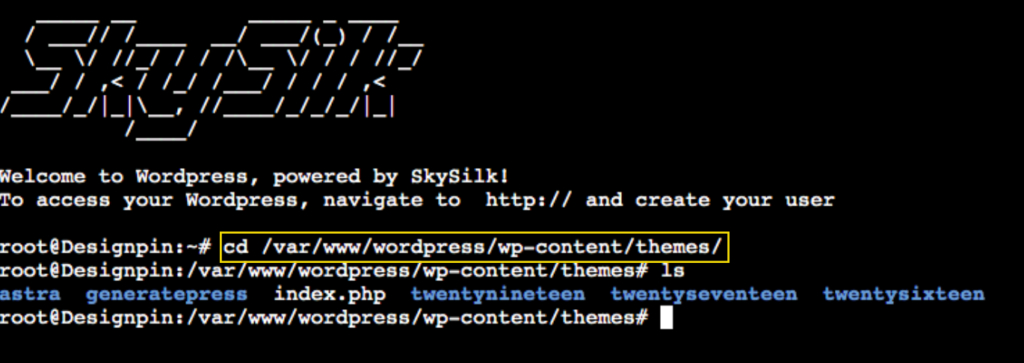
Navigate to the directory with the following command, in yellow.

To make sure we’ve landed in the right directory, the above command should be followed by a “ls” command.
In this scenario, the parent theme is generatepress. Therefore, create a directory named generatepress-child.
mkdir -v generatepress-child
Inside the child theme directory on WordPress, there should be style.css and functions.php file. For the theme’s image, you can copy the screenshot.png file from your parent theme folder.
Read more: 10 Must-Have WordPress Plugins for 2020
Start by Creating Style.css
Navigate to the child theme directory through SSH by using a similar command above
cd ../themes/generatepress-child
We should now be inside the child theme folder. Create style.css with the nano editor.
nano style.css
Once you run the above command, you will see a blank black screen where you can paste your code. Copy and paste the below code in the editor.
/*
 Theme Name:   GeneratePress Child Theme
 description: >-
   A child theme of the GeneratePress WordPress theme
 Author:       Myname
 Template:     generatepress
 Version:      1.0.0
*/
Let’s save the style.css file and exit the editor by using the following commands:
CTRL + X
Y
ENTER
You can now check inside your WordPress dashboard and make sure that the child theme is installed.
Now Create Functions.php
We’re halfway through creating your child theme for WordPress! Now, let’s create functions.php file and bring all the styles of the parent themes using the nano editor.
nano functions.php
In the dark blank screen (nano editor), paste the code below, followed by your code.
add_action( 'wp_enqueue_scripts', 'enqueue_parent_styles' );

function enqueue_parent_styles() {
   wp_enqueue_style( 'parent-style', get_template_directory_uri().'/style.css' );
}

// Your code here
Save and exit from the nano editor with the following commands.
CTRL + X
Y
ENTER
We have now completed the basic setup of a child theme for WordPress! You can edit the files style.css and functions.php right from your WordPress dashboard.
To do so, go to: WP-ADMIN >> Themes >> Theme editor
Read more: How to Optimize High Traffic Websites in 5 Steps
What Can You Do Now
Creating a child theme is easy, isn’t it? In a world full of possibilities and scope of improvements, customizing your WordPress website becomes easier when you have a child theme. Customize your single posts with a custom post template, change the whole structure of header and footer or give a new look to your website without losing code on a theme update.
Use promo code “SKY95WPCHILD” to save 95% off your first month. Offer is valid for new users only.
About the author: Vashishtha Kapoor is a Digital Marketing enthusiast and has over 5 years of experience in SEO, PPC, Website Management and WordPress development. Vashishtha writes about WordPress customizations, website designing, technology trends, and ad-tech topics.


